.

.

Search This Blog

Saturday, March 5, 2011

Pink and Blue eyeshadow look


Eyes:
BFTE pigment in "Raspberry" on the inner half
BFTE pigment in "Blue Bird" on the outer half
MUFE e/s 92 in crease
Mac "Carbon" in outer corner

So busy with school! It's killing me :( This look was done a few weeks ago. I haven't played with makeup in weeks!! Things will calm down just a LITTLE BIT after wednesday ...*sigh*

Hope you're having a much better weekend than I am!

Saturday, February 26, 2011

Dramatic Cut-crease look!

I bought 6 samples from Beauty from the Earth, and so far I really like them! They were having a sale a few weeks so I said why not?! :)

The gold I'm wearing on my lid is the most shimmery, sparkly, and the prettiest gold ever! The shimmer didn't really get picked up by the camera :( The gold looks a LOT better in person!


No flash. You can see all my pitted acne scarring :(

Eyes:
I used Mac "Blacktrack" fluidline to cut the crease with an angled liner brush - I made the line kinda thick and smudged out the outer edge with a smudger brush
I foiled BFTE pigment in "Whimsey" all over my lid
I patted on BFTE pigment in "Blue Bird" on the crease and kinda smudged it out a little
To make the blending look better, I sweeped Ben Nye's eyeshadow in "Cosmic Blue" right above "Blue Bird" and outwards
Darkened the outer corner a little with Mac "Carbon"

Lined with a L'oreal liquid eyeliner I forgot the name of and Mac greasepaint stick in "slick black" on my waterline!

Saturday, February 19, 2011

Matte coral-pink eyeshadow

I almost never do all matte eyeshadow ..ever. But I kind of really like it! I actually sat down to do a shimmery green look, but when I was sifting through my Fyrinnae eyeshadows, I came across this blush and wondered what it would look like on my eyes ..and here it is!


Urgh ..my lashes are detaching ..


I don't have too many matte eyeshadows so I had to dust off my 88 matte palette.

Eyes:
Random eyeshadows from the 88 matte palette on the inner eye
Fyrinnae "Enchant" blush in the middle of the lid
Mac "Signed, Sealed" on the outer corner
Mac "Carbon" to darken the outer corner just a little
Mac "Feline"
Loreal "Lineur Intense" liquid liner

Face:
MUFE Face & Body mixed with MUFE HD
BB Corrector in "Peach"
tiniest bit of Fyrinnae "Enchant" on my cheeks
Kett Sett Powder 

Lips:
Mac "Pink Grapefruit" lipglass

I think I should really invest in more matte shadows!

Saturday, February 12, 2011

Taupe-y Smokey eye

I wore this the other night for my friend's birthday ..Sorry I don't have a close-up! I kind of rushed. Only had 20 minutes to get ready after I came home from work!


Eyes: UDPP
Mac "Soft Brown" in the crease
Mac "Vanilla" pigment on the inner eye
Mac "Smoke & Diamonds" in the middle
Mac "Dark Edge" on the outer corner
Mac "Carbon" to deepen the outer corner

Face: MUFE HD mixed with NARS Sheer Glow
BB Corrector in Peach
Kett Sett Powder
Lorac "Flaunt" blush

Lips: Mac "Splashing" Lipglass

Tuesday, February 8, 2011

OCC Lip Tars in Trollop, Grandma, and Memento - Review + Swatches!

I've been hearing about them forever and finally got the chance to try them at IMATS! That was way back in November ...I know I'm so late ..gahhh!


But yeah, I ended up buying three of what seemed like the most wearable shades; Trollop, Grandma (the UBER popular), and Memento. They have a wide range of shades, including blue, green, yellow, black, and white, that are meant for mixing. But I didn't bother with those .. I'm very very lazy .. I just wanna pick up one thing, put it on and go! So those three were the one that stood out to me the most.

These retail for $13USD on the OCC site, but I got them for $10 CAD at IMATS


Ingredients: Ricinus Communis (Castor) Seed Oil, Cannabis Sativa (Hemp) Oil, Mentha X Peprita (Peppermint) Oil, Tocopherol Acetate (Vitamin E)
May Contain: D&C Red #7, D&C Red #30, FD&C Blue #1, FD&C Yellow #6, Iron Oxides, Titanium Dioxide


What they claim: "A stunning new innovation in lip color, OCC Lip Tar combines the longevity of a lipstick, with the ease of application of a gloss. Goes on slick and moist, and dries down to a satin finish. Ultra-saturated in color, Lip Tar contains an unprecedented amount of pigment - a little goes a very, very long way! An intense yet featherweight layer of color that stands up to the scrutiny of Hi-Def Video and Digital Photography, without ever looking (or feeling!) heavy. Meant to be mixed, Lip Tar comes in concise array of colors for a limitless selection of shades made by you!

Like all of our products, OCC Lip Tar is 100% Vegan and Cruelty-Free, and is also free of parabens and other harsh preservatives. A simple, elegant formula that contains Hemp Oil, Peppermint Oil and Vitamin E, OCC Lip Tar feels as good on the lips as it looks!"


Trollop is described as a vivid cranberry pink, Grandma as clean classic coral, and Memento as Coquettish pink/plum. I really LOVE the shades! 

They're basically liquid lipstick and come in a small tube (8ml), and you only need the smallest amount. Even though they look like lip gloss tubes, do NOT EVER apply them straight!! You definitely need a lip brush with these! They are extremely pigmented and long lasting. 

One thing you HAVE to keep in mind, is to have really well exfoliated and moisturized lips. They dry down to a matte-ish satin finish, and tend to cling to the flakes and lines if you have them. So I highly recommend that you exfoliate your lips and moisturize them every night! This was probably the only thing I didn't like too much about these. I expected the formula to be glossy and moisturizing, but because of the satin finish, it was a little bit drying for me. They look great in the morning when I first put them on, but throughout the day, I started noticing the flakes and it kind of started settling into my lip lines. This was probably after 2-3 hours of wear, which is still a long time! 

Another thing is that it has a strong peppermint smell/flavour. It doesn't really bother me too much, but some people may not like it or are allergic to it. 

Overall, I really do like them a lot, but think they maybe a little too drying for me. However, I still love them and will use them mixed with a good lip balm to get a sheerer, more moisturizing formula. 

I rate these 4/5 and will definitely recommend them! A word of caution: LESS IS MORE with these! Seriously ..

Now onto the swatches :)

From top to Bottom: Memento, Trollop, and Grandma

This pic is a better representation of Trollop


Wednesday, January 5, 2011

Happy New Year!! + Purple FOTD

Hi guys! I know I've been MIA for so long now ..I've finally decided to come out of hiding! In the summer I got really busy because my dad bought a new house and we did most of the renovations ourselves. And when school started, I was completely out of touch with makeup! I didn't buy much, because I only worked one day a week so budget was limited, and also because school was so hectic! I'm in a criminal justice program so that requires me to write countless research essays and presentations .... Boo!

Moving on .. :)
On lid: Face Atelier shimmer eyeshadow in Pink Glaze
Outer 1/3rd: Makeup Forever #92
Outer crease: Mac Top Hat e/s and Carbon e/s
Highlight: Mac Shroom


Face: 
Cinema Secrets foundation in 301-63A and 302-65A
Eve Pearl Salmon concealer and treatment in medium/tan (a little too dark for me!)
Mac blush in Fleur Power
Kett Sett Powder
Makeup Forever WP Brow Corrector in Brown/Black

Eyes:
Face Atelier shimmer in Pink Glaze
Makeup Forever e/s #92
Mac Top Hat
Mac Carbon
Mac Feline
Mac Shroom
Diorshow Waterproof Mascara
Random Falsies

Lips:
I think I was only wearing Carmex

Tuesday, July 13, 2010

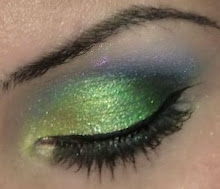
Tutorial: Simple Blue-Green eyes

I know this look is ANYTHING BUT simple to some of you, but in my world, this is as easy and simple as it gets. You guys wouldn't believe it but, I don't wear ANY eyeshadow to school or work! If I do, most I'd do is a wash of champagnish colour on my lid OR a highlighter. That's why I every time I use colours, I go all out and go bold!

I had no idea what I was really going for when I started this tutorial. I just picked up random colours and in the end, I came up with a look that's almost the same as my OTHER blue-green look. GAHH!! WHERE HAS MY CREATIVITY GONE?!

Hopefully you guys will use different, more EXCITING colours than the ones I've used. I just did this to show the process and technique.


First thing you must do is start off with a clean, makeup-free eye.
Apply your favourite primer. I used and like Urban Decay Primer Potion.

Blend it out, all over your eyelid, upto your browbone.


Now, I want colours on my lid to stick, but I want the colour on my crease and high crease to be blended out and softened. Because UDPP is sticky (and blending is a b*tch on it), we'll pick up some powder with a big fluffy brush (Mac 224) and apply it in the crease, blending outwards. I usually use baby powder, but MUFE HD was nearby so I just used that. This will smoothen the area and colours will blend much nicer and softer.


Apply the powder and your highlight. Make sure it's satin or matte. We're using shimmery colours on the crease and want to balance out the look by using a matte highlight.

Next, I took a crease brush (Mac 226) and applied a matte blue eyeshadow (Ben Nye Cosmic Blue) in my crease, all around, focusing more on the outer half and not bringing it too close to my inner corner as I have close-set eyes. Another thing is, I almost always use a matte colour in my crease.
The reason is, matte darker colours, recede and make the crease appear deeper and darker. Shimmery colours reflect light and highlight. I usually only keep the shimmer on the lid, and use matte colours on the crease and up. Using shimmer on the lid and crease also doesn't look too good in pictures. All the shimmer will reflect light from the flash and it will just look like one big messy shimmerball.


Use a blending brush and blend it out. Start with a little bit of colour first, then keep going back and adding more colour and blending. It's easier to go darker, but not easy to go light from dark. So add a little bit of colour first then gradually build up to the intensity you want. I also patted some concealer all around my eyes and on the lid. This step is optional. At this time, you can also pat on some colour base if you want the eyeshadow to be brighter. I would have used dwelft paint pot from Mac but decided to skip it. Beacause it was ALL the way on the OTHER side of the room and and I was on my bed and was too lazy. So far, you should have something like this.

Next, I take my inner lid colour. I picked up Mac Gilded Green, but you can use any light shimmery green.
Apply the green on the inner half of your lid with a flat brush. PAT IT! We want the shimmer to stay and have the least amount of fallout as possible.

Next, I took Mac Teal Pigment with another flat brush. Tap the brush on the lid to get rid of the extra.

Pat it on the outer half of your lid.

You should now have something like this. But a little prettier because my camera sucks.


You can probably leave it like this and finish it off with some mascara and liner. But ...

I like to make things more dramatic. So I take my tiny detail brush and pick up some Mac Carbon. Make sure it's a matte black eyeshadow!


We then apply it in the crease, not going past the middle.

Take a blending crease brush (Mac 226) and blend out the black. You can go back and add more black, and blend it until you get it as dark as you want.
You should have something like this.

Now add some liner (Mac Blacktrack Fluidline), Mascara (YSl Faux Cils), and Falsies. And don't forget to take a small brush and run the colours on the bottom lashline too! Totally forgot that step. and VIOLA!

I hope this wasn't too confusing! And that it made sense and looks good because I'm at work as I type this lol in a 2 x 4 screen. I can't really see the whole thing. Sorry if this is too long and detailed!

Have a great day! <3